Overview
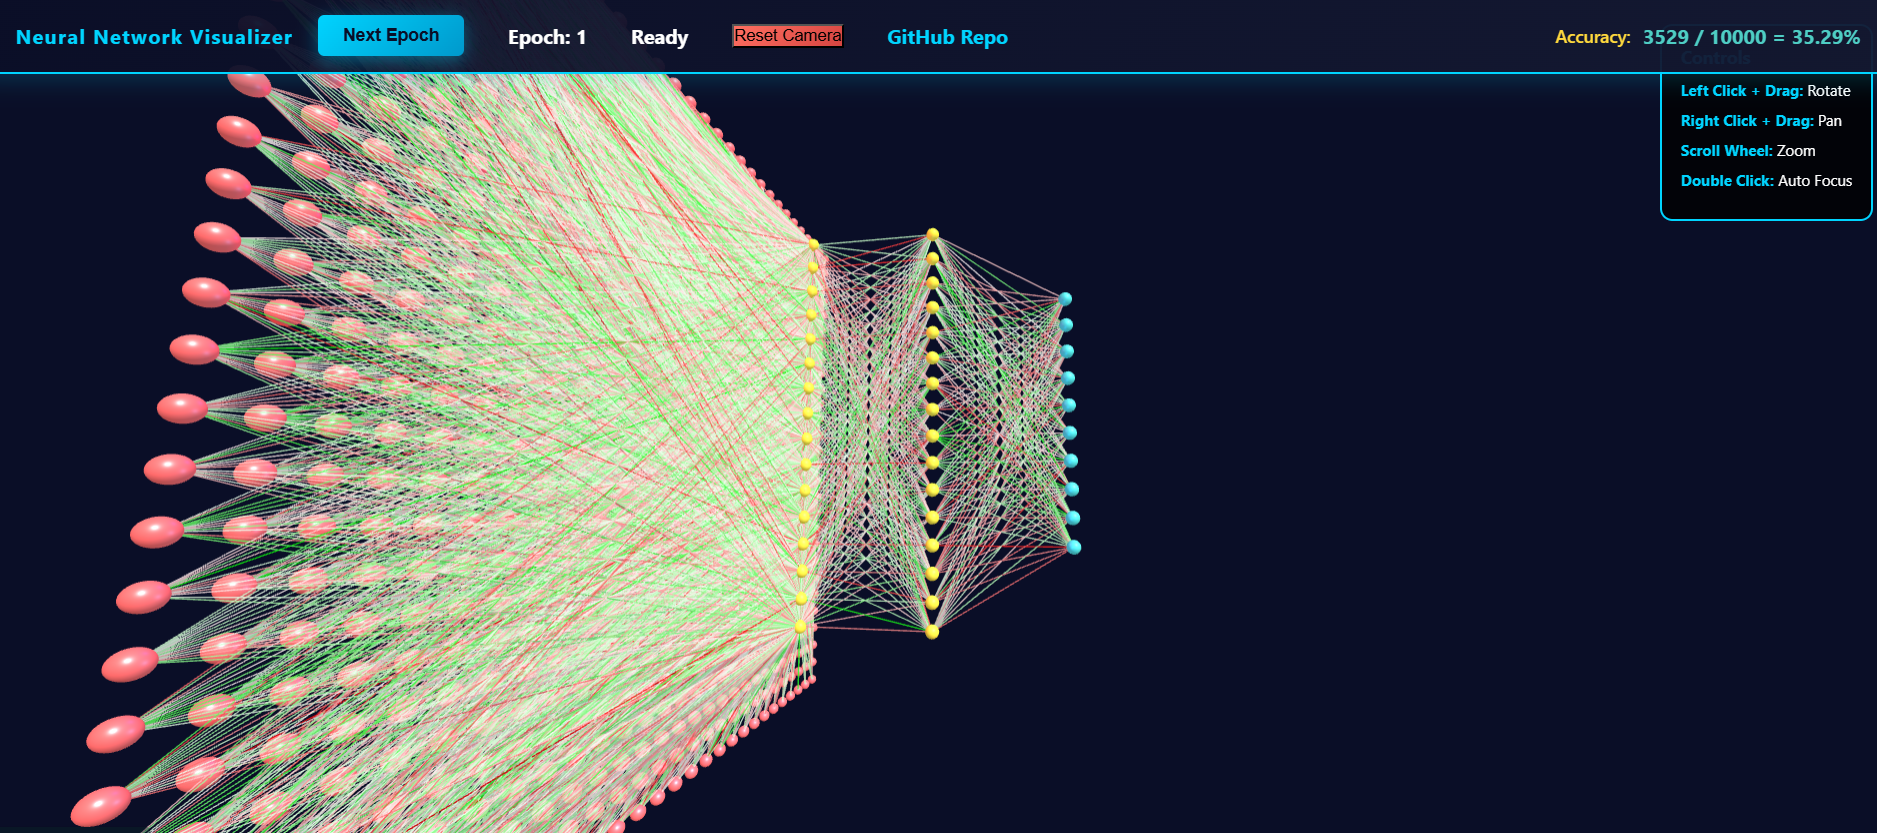
Visualization of a machine learning model, and making its difficulties intuitive. Display a 784 (28 * 28) -> 16 -> 16 -> 10 neural network using spheres as neurons and lines as connectors in threejs to completely visualize a simple neural network. Live learning using the MNIST dataset.
Sample image:
Details
Over winter break, I wanted to get more into machine learning. So, I started poking around with the MNIST database, and eventually made my own little project. This is a writeup for that, where I write my own thoughts down.
I was reading up on the basics of neural networks, when I was annoyed at the lack of useful visuals. Seems like neural networks, given their popularity, should have some more interactive elements.
Furthermore, people want this. Models have a clearly and precisely defined structure, and it is difficult to convey this intuitively through words. People want to be able to see this model as others more informed than them would approve it, instead of being able to just see this model in their imagination.
So, I made my own. And I learned why these don’t exist, except for in our minds, communicated by words– they’re extremely hard to make well. And extremely annoying.
Technical Details
My process:
man, projects are so much more involved than I thought they were. I wanted to do more, but it really wasn’t worth the effort. Whatever the case, I did create my own custom neural network and visualizer, so it counts as a win in my book!
Summary of my process:
- Understand neural networks from the bottom up using 3Blue1Brown - But what is a Neural Network? with - ! Neural networks and deep learning
This textbook is amazing, especially with using the internet / AI to clarify answers further. Expected knowledge: Calc 3 + Linear algebra. Roughly year 1 of college (freshman college knowledge) on the standard knowledge tree.
- live code development on google colab.
Google colab was so much better than what I thought it was. A couple years ago, I saw it just as a jupyter notebook wrapper, and, while it still is, having it be able to run on google’s GPU servers makes it blessed– they’re stuff is now several times more powerful than my own scrummy laptop.
Why run on their servers instead of my personal machine? Because their servers are better. I will definitely be exploring it further.
- Converting it into a webpage that can be run
This required a couple of things:
- threejs knowledge / understanding of basic spaces and dimensions. This isn’t that hard, especially if you already have a bit of game-dev experience. - Table of Contents | Discover three.js was very useful.
- conversion of python to javascript. I wasn’t sure if I wanted to run everything in huggingface spaces, and even then I wanted the stuff to be custom made. Using AI to convert from python to JS made this a breeze.
- server testing - thank goodness for VScode’s plugin live preview. This allowed me to avoid having to actually set up a backend when testing.
VScode’s copilot was also amazing for this. I feel like it’s only getting better and better, which is both amazing and terrifying. Kinda like playing hot potato, and you know eventually all that energy needs to get somewhere.
- Deployment onto huggingface spaces:
This went over relatively smoothly, but I can’t figure out how to include images in the README. This was annoying, so I gave up and just created a sketchy submodule in my github for huggingface deployment. Everything’s still manual (no action workflows), but it works.
- Future plans:
I definitely wished I did more, but I lack the time-efficiency to do so. Generally:
educational: visualization per ML module - convolutions, maxpools, attention - power by tensorflow module - instead of re-writing from scratch, just extract weight / bias values from their code - Getting weights from tensorflow.js neural network - Stack Overflow
- customization: be able to change ML module hyperparameters on the fly:
- adding adjustable features per module: regulariation, activation function, custom custom functions
- look at math implementation in textbook - Neural networks and deep learning
- being able to visually add new layers / new neurons, and even change the output layer (eg: a new node with one-hot encoding “not a number”)
- adding adjustable features per module: regulariation, activation function, custom custom functions
- Evolutionary approach - optimizing hyperparameters (number of parameters / edges
Lessons Learned / Conclusion
While I wasn’t able to get all objectives, I was able to still show a proo-of-concept, which is the essence of what I wanted to do.
Still, this was really fun!
I wish I had a more concrete plan going into this– that’ll come with experience. For now, I just need to focus on one thing when I’m engineering: modular testing. Heavily, heavily modularize each section and test each field before integration. Making each part work and then putting it together is so so so much easier, more efficient, and more educational than putting everything together and then testing.
Whatever the case, this development is able to show me a concrete ‘thing’ that I can use as a foundation to see all ML models and their architectures.
I hope it is helpful and enjoyable to you too!